File Management
Click the File tab to see the Image-Pro File Management view. If you need to open a file or image set, create a new file, import a dataset from several individual files, print, save, or change options, the File Management view is the place to do it.
File Management Commands
Related Topics
Opening Files
There are several ways to open files from the File Management view.
Recent
Select the Recent option to see a list of files that have been opened by Image-Pro in the past, ordered by date. Click on any item in the list to open it.
You can use the Search field above the list to find files of interest.
This PC
Select This PC to open a file browser in the File-Management view.
Use the selection tool in the bottom right-hand corner of the browser to toggle between the thumbnails view and the list view.
Browse
Click on the Browse button to show a file Open dialog which lets you navigate your file system outside of the File-Management view.
The Open Dialog Box
On the bottom right of the dialog, there is drop-down menu that lets you select files by type. By default, this is set to All Readable Files (Image-Pro uses the file's extension to identify its format e.g., TIF for TIFF, PCX for ZSoft files, BMP for bitmap files, etc.). You may also open an image sequence (*.seq), Image-Pro workspace (*.ipw) or multimedia (*.avi) file.
If your image file does not use standard format-identifying extensions, you must type the name of your file in the File Name field, and then select its format from the File Type list box. Otherwise, Image-Pro will select a format based on the file name extension.
Note: Image-Pro will read only video data from a multimedia AVI file. It does not support sound, even if a sound card is present. Image-Pro will read only the bitmap (raster, not vector) data from a PICT file. Multi-dimensional set files, such as Image-Pro Set and InVivo file formats may open multiple image workspaces.
- Open Best Fit: This option takes effect only for Gray Scale 12, Gray Scale 16, RGB 36, and RGB 48 images. Select this check box if you want Image-Pro to modify the display range to compensate for the narrow dynamic range of an image. Click here for a more information.
- Open As Sequence: Check this box to open multiple files as an image sequence. For example, if you check this box and select four image files by clicking on each one while holding down the <CTRL> key, Image-Pro will merge the four files into a single (new) sequence file.
- Group Related Files - when this option is on, the files of certain formats are grouped together and opened as a sequence or image set. When this option is off, the files are not grouped and can be opened as single images.
Opening Raw Files
When the file format is .RAW or is unknown you are presented with a dialog box, which allows you to specify the file format characteristics in order to load it as raw data. This only applies to single image files of compatible format where the pixel data is uncompressed and stored as consecutive integer values.
The following values can be specified in order to match the file format organization.
- Data Type: Either monochrome or color RGB.
- Byte Order: Specifies the meaning of each byte of data, either least or most significant bit first.
- Bits per Pixel: The number of bits needed to represent each pixel.
- Width: Image width in pixels.
- Height: Image height in pixels.
- Start Offset: Offset of image data within the file in bytes.
- Line Offset: The full length of each image line in bytes including any padding bytes.
Add a Place
Select Add a Place to navigate to and add a shortcut to a frequently used folder to the file management view.
To remove places from the File-Management view select the drop-down menu on the right of the place’s button and select Remove Place.
New
Use the New command to create a blank image of specified dimensions and class. After creating a blank image, image data can be copied into it using the Paste command.
Image Type: From this list box select the kind of image you want to create. Image Type defines the type and depth in bits per pixel (BPP) of your new image. The following image types can be selected:
|
IMAGE TYPE |
BITS PER PIXEL |
|
Gray Scale 8 |
8 BPP |
|
Gray Scale 12 |
12 BPP |
|
Gray Scale 16 |
16 BPP |
|
Floating Point |
32 BPP |
|
RGB 24 |
24 BPP (8 bits per color channel) |
|
RGB 36 |
36 BPP (12 bits per color channel) |
|
RGB 48 |
48 BPP (16 bits per color channel) |
Click on the Background Color button to select the initial color fill for the new image.
Resolution: Within this box you can specify a logical image resolution in terms of dots-per-inch (DPI). If the Units selection is set to cm, this value will be used to calculate the spatial resolution (i.e., dimensions in pixels) of your new image. For example, if you set Resolution = 100, and Width and Height = 2 cm x 2 cm, your image dimensions will be established at 200 pixels x 200 pixels. If the Units selection is set to Pixels, you may assign a logical resolution to the image, but it will not be used to determine the image's spatial resolution.
After the image is created, Resolution can be viewed and changed using the Info command. Image-Pro stores the resolution value with most file types (TIFF, for example). Image-Pro will use this information only to determine the image size for printing, however, many external programs including the Report Generator, use this resolution to scale an image when it is imported (see the Info command for more about this).
Width: Enter image width in cm, if the Unit field is set to cm, or in Pixels if the Unit field is set to Pixels. The width value establishes the number of pixels the new image window will contain in the horizontal direction.
Height: Enter image height in cm if the Unit field is set to cm, or in Pixels if the Unit field is set to Pixels. The height value establishes the number of pixels the new image window will contain in the vertical direction.
Unit: From this list box, select the terms (cm or Pixels) in which you want to express the Width and Height values. When cm is selected, the image's spatial resolution is derived by multiplying the Resolution value by the Width and Height values (e.g., if Resolution is set to 100, and Width and Height to 2" x 2", image dimensions will be established at 200 pixels x 200 pixels). When Pixels is selected, image dimensions are established directly from the Width and Height values that you enter.
Number of Frames: If you are creating a sequence of images, enter the number of frames in the new sequence. Otherwise, for single images, enter 1.
Memory: This item displays the amount of memory the image requires. Memory requirements are determined by:
Height * Width * BPP * 1/8
where Height and Width are measured in pixels.
Note: Gray Scale 12 uses 16, not 12, as BPP in the above memory requirement calculation. Although a Gray Scale 12 image uses only 12 bits per pixel, the 12 bits occupy 2 bytes (16 bits) of memory. Similarly, RGB 36 uses 48 BPP in the calculations.
Create: Click this button to create a new, empty window of the specified size and class.
Import
You can build multi-dimensional datasets from a folder of image-files using the File-Management view Import function.
Click Import, then click on the Choose a Folder button. The Select Image File Folder dialog opens, navigate to the folder that contains your files to import, then click Open. All of the files in the folder are displayed in the Select Data of column.
Organizing Data from File names
Image-Pro can automatically order files in an imported dataset if the position of each file within each dimension is included in the file name without ambiguity.
The image below shows some example files for which this is the case:
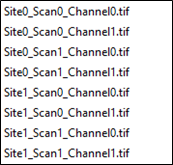
Select a single file from the Select Data column, then click the Set Reference File button in the Define Dimensions column.
Image-Pro detects any incrementing numbers in each file name and provides drop down menus that allow you to define which dimensions each of the numbers in the file name represent.
In this case, the first number represents the Site dimension, the second number represents the Scan dimension, and the final number represents the Channel dimension. Image-Pro generates drop down menus to select the correct dimensions for each element of the file name in the Define Dimensions Column.
Manually organizing Files into Dimensions
The image below shows some example files that cannot be organized based on the information in the file name of each file:
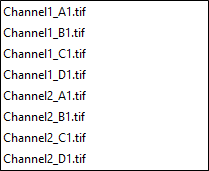
There are some files that cannot be organized based on the information in the file name of each file.
Files can be manually organized into the correct dimensions.
In this case, all the files with Channel1 in the name must be selected simultaneously in the Select Data column.
Under the Channel Settings section of Define Dimensions, the option to add the selected files Collectively at Index 1 must be selected, then the Add button clicked.
The selected files also represent 4 positions of a multi-well plate.
Under the Site Settings section of Define Dimensions, the option to add the selected files Incrementally, starting at Index 1 must be selected, and the Add button clicked.
Similarly, all the files with Channel 2 in the name must be selected simultaneously in the Select Data column.
Under the Channel Settings section of Define Dimensions, the option to add the selected files Collectively at Index 2 must be selected, then the Add button clicked. Under the Site Settings section of Define Dimensions, the option to add the selected files Incrementally, starting at Index 1 must be selected and the Add button clicked.
Organizing Files Sequentially
The image below shows a folder of files that lack useful dimensional data in the file names, but which were acquired in a known sequence, in this case there are 2 sites, 2 scans per site, and 2 channels per scan, with the channel dimension changing the fastest, and the site dimension changing the slowest.
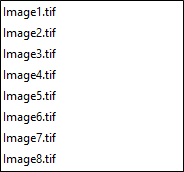
Select a single file from the Select Data column, then click the Set Reference File button in the Define Dimensions column.
As there is only in single incrementing number in the file name, only a single dimension drop-down menu is shown in the Define Dimensions column.
To be able to define the order in which dimensions were acquired, the Multi option must be selected from the drop-down menu.
You must then define the dimensions in the dataset, from the outermost (the most slowly changing dimension), to the innermost (the most quickly changing dimensions).
In this case, the Site dimension must be selected from the dropdown, and set to 2.
The Add Dimension button must be clicked, and the Scan dimension must be selected from the newly added dropdown and be set to 2.
Finally, the Add Dimension button must be clicked again, and the Channel Dimension must be selected from the newly added dropdown and be set to 2.
The product of all the dimensions must match the number of files for the import to be valid. In this case 2 x 2 x 2 = 8, so the import is valid. If this is not the case, a warning will be shown, and you will not be able to import your dataset.
Defining Channels
In the Channel Settings section of the Define Dimensions column, click the Dye button for each channel in your dataset. Select the appropriate dye in the drop-down menu of the dialog that opens before clicking the Apply button.
Defining Z Spacing
In the Z Settings section of the Define Dimensions column, set the Z spacing and select the units from the drop-down menu.
Defining Well Plates
If you are importing a multi-well plate dataset, select the Arrange Sites into plate with : checkbox from the Site Settings in the Define Dimensions column. You can then set the number of Rows and Columns in your plate before clicking the Apply button.
Reviewing Data Before Import
The Review column has a table in which each dimension, and the size of each dimension is shown.
There is also a preview that allows you to scroll through the dimensions of your dataset using a dataset navigation tool.
You should review the table and the preview to ensure that the files that you wish to import are organized correctly.
Click the Open Set button to import your files into Image-Pro as a multi-dimensional dataset.
Save
If your active dataset has been modified, you can save the changes by selecting the Save option from the File-Management view.
You can access the save option by using the CTR + S key combination.
Save As
If you want to change either the name or file format of a data set, select Save As from the File-Management view.
With the Recent option selected, you can browse your system for the location where you wish to save your data set.
Use the selection tool in the bottom right-hand corner of the browser to change between the thumbnails view and the list view.
You can edit the save name of the dataset and select the file format from the drop-down menu.
If you have several modified data sets open the Save All option will be activated, which allows you save all your documents with their current names and save locations.
Select the Browse option to open a file browser Window from which you can choose your save location, file name and file format.
You can add shortcuts to your regular Save locations by selecting Add a Place. Places can be removed by selecting Remove from a place’s drop-down menu.
Select Print from the File-Management View to access the Print, Quick Print and Print Options.
Feedback
Select Feedback from the File-Management view to be automatically directed to the Media Cybernetics feedback portal.
Options
Select Options to open the Image-Pro Options Window.